Make the user experience more personal with custom fields
In recent years, the personalisation technique has made great strides in marketing and it has become quite relevant in many companies' strategy.
From the customer's name written on Starbucks cups to the invention of the voice assistants Siri and Alexa: there is an increasing attempt to involve and capture the attention of the consumer with a communication addressed to him/her personally.
And what is even more interesting today is that it is not only the company that seeks direct interaction with the possible buyer, but it is the user himself who expects to be offered products based on his personal characteristics. In this regard, we can observe the data reported by Forbes in an article of February 2020. The study shows the following:
- 80% of consumers are more likely to buy from a brand that provides personalised experiences;
- 63% of consumers will stop buying from brands that use poor personalisation tactics;
- personalised shopping cart recommendations influenced 92% of shoppers when they were planning to make an online purchase.
These surveys confirm what we said above: personalisation really does make a difference to the user.
There are a number of techniques and strategies that can be implemented in order to offer the consumer an experience tailored to their needs. First of all, it is clear that the construction of the message is increasingly important, as it succeeds in making the interlocutors perceive that what is written is addressed to him/her specifically, and not to an indistinct audience.
In the case of email there is a tool that helps a lot in the personalisation of the text: these are the dynamic fields, i.e. special 'placeholder' codes which - as the name itself suggests - are 'dynamic', changeable, adaptable according to the recipient. From a technical point of view, these are elements placed in square brackets/graphes (such as {{Name}} for the contact name), which the platform recognises and replaces with the correct value for each individual contact in the database.

The great advantage is that there are no limits to customisation. You can choose to make any element of the text dynamic, depending on what you want to communicate. Let's see some examples.
Dynamic fields: which ones you should take into consideration
Name
In a globalised world such as ours, where mass production and consumption have led to a process of standardisation of the goods and services offered to consumers, addressing a user with his/her name gives added value to communication. It is the same as above: consumers tend to feel more gratified and closer to the brand when a confidential attitude is taken towards them. So why not apply this technique to emails as well?
Thanks to dynamic fields, we can insert the recipient's name anywhere in the message: in the subject line (e.g. Julie, we have something to tell you), at the beginning of the email (e.g. "Hello Julie", preferable to the generic "Hello"), or even in the middle/end part of the text. If inserted just before the final call to action, the name reference will give emphasis to a sentence by inserting the name in it (e.g. "Julie, this is your chance, don't let it slip away").
What about the surname?
Depending on the level of formality of your message, you can choose to limit yourself to just the first name or include the surname as well.
Today's communication has undergone a process of 'modernisation' compared to the past and so there is now a tendency to call the consumer by their first name only, in order to make the text less 'rigid' and closer to the user, but despite this there are situations in which it is preferable to opt for a more formal style, and therefore include the surname. This is the case, for example, with newsletters aimed at B2B (business to business), where recipients expect a less colloquial tone and where it is preferable to address the contact person of the company with the full name.
In these cases, remember to activate two custom fields, {{Name}} and {{Surname}}, which should be inserted next to each other (e.g. Dear Julie Jackson).
Date and time
The custom fields can also help us when we want to insert information into the message such as dates and/or times that change according to the recipient.
Let's think about the case of an email reminder of an appointment. In all likelihood, not all users will have to come on the same day and at the same time. We could then use the fields {{Date}} and {{Hour}} and let the system assign the right value to that parameter.
Or suppose you want to let the user know that his subscription is about to end and needs to be renewed, but the expiry date depends on the day the individual customer bought it. Again, just enter the {{Date}} field and let people receive a communication that suits their specific case.
Discount percentage
These are the months dedicated to the winter sales; it is a very special time of year, when companies compete to propose the best offer to the consumer, in order to catalyse his attention and be chosen over his competitors. But who says that this super offer has to be the same for everyone? Why, instead of planning a one-size-fits-all promotion, don't we think about a discount that varies according to the customer you are targeting? You could, for example, choose to reward the most loyal buyers by giving them a bigger discount than everyone else. The percentage to be reported would then change, and here again we could use a dynamic discount field.
Other custom fields
There are many alternatives for dynamic fields, depending on our business. If, for example, we are targeting businesses, we could make the name of the company dynamic, but also the sector in which it operates (e.g. cosmetics, sport, ecology). If, on the other hand, we are addressing individual consumers, we may need to specify the client code, the size, or we may even refer to their hobbies/preferences, depending on the information we have and the focus of the communication. Thanks to dynamic fields this is
How to insert dynamic fields in Mail Marketing
From theory to practice: how do I add custom fields to Mail Marketing? The procedure is very simple: when composing your newsletter, simply select the box dedicated to text and click on "Merge tags" at the top, choosing the field you are interested in (see figure below).
If, on the other hand, you wish to insert the dynamic field inside the subject line, just click on the green button "Custom fields" and select the type of custom field you want (choosing between Personal information, Contact and Custom fields).
There is an other important thing to say: not all dynamic fields are set by default in Mail Marketing. For example, the discount percentage, which we mentioned above, will not be in the default list. The same applies to size, company sector, and so on. These are non-standard fields, but you can still create and include them yourself and their labels are {{CustomFiled1}}, {{CustomFiled2}}, {{CustomFiled3}}, {{CustomFiled4}}.
To customise these types of dynamic fields you can proceed in this way: once you have logged into Mail Marketing, on the left menu click on Settings > Custom Fields and you will find four free fields. Each of these ones can be filled in with the text component you wish to customise. Once you have saved the new fields you can go to Campaigns > Create in order to create your newsletter. Then, within the text, by clicking on "Merge labels", you can choose "Custom field 1/2/3/4".
How to segment your email list in Mail Marketing
We have seen how to create personalised emails using custom fields, but there remains another important question to address: how do we ensure that the dynamic field is associated with that specific name/date/discount?
It all depends on how the contact file is structured: it must necessarily be divided into separate columns, each of which should contain the element that we will call up in the email.
Therefore, in addition to the column of the email address, there should be added as many columns as the information we need.
As soon as you have loaded the contact list under Contact list > Import from file and you have reached Step 3 - Associate fields, you will have to assign the data in each column to a specific field. Consequently, the list of names will be labelled 'Name', emails will be labelled 'Email', Custom field 1 will be labelled 'Custom field 1', and so on.
Pay close attention to this step, because incorrect loading of contacts affects the real effectiveness of custom fields. The risk is that, if the file in the address book is not well structured, the user will end up with an email that says "Hello {{Name}}", instead of "Hello Robert", for example.
Check the functioning of dynamic fields
If you want to make sure that everything is working properly, you could make a test submission to your email address before proceeding with the final submission, following this procedure:
- enter your data into the uploaded file, making sure that the information matches the labels in the file correctly;
- when you reach Step 4 - Select target, you will find - under the Address Book - the function Filters: select Email > Include only and, in the free space, write your email address;
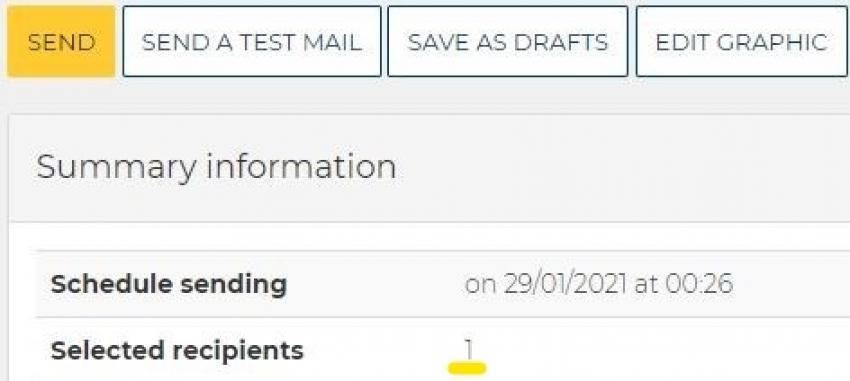
- continue with the sending procedure and, in the final step (Step 6 - Test and send) check that the number of selected recipients is only 1;

- last step: send the newsletter and check that, once it has been received in your inbox, the dynamic fields have been modified correctly.
Now that everything is ready you can schedule the actual sending to your contacts!
As you have seen, the inclusion of one or more personalised fields gives your communication a whole new look. This is why we suggest you to prefer a copy adapted to the characteristics of your target audience.
Our advice is not to create the message starting from the product, but to develop it while thinking about the person who will read the text. The first step in the creation of a marketing strategy should be to analyse the target audience and try to reproduce their language, using small expedients - such as custom fields - which will give the user the perception that the communication is really intended for them, and no one else.


